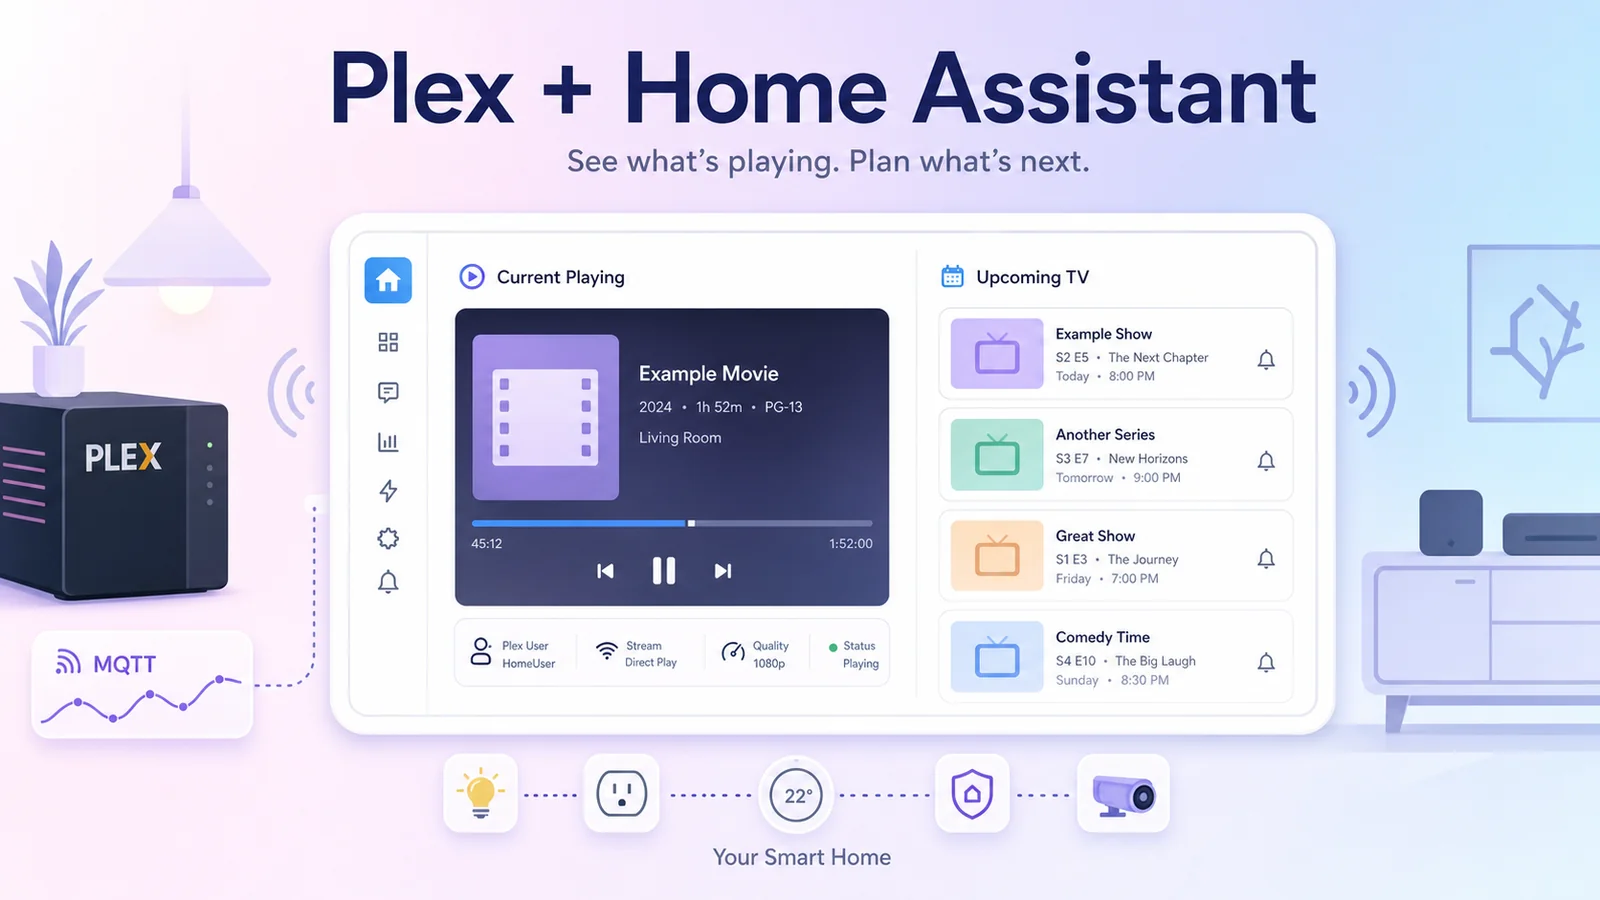
Hiển thị Plex Current Playing và lịch phim sắp chiếu trên Home Assistant
Dùng Tautulli, MQTT, Sonarr Upcoming Media và một vài custom Lovelace card để biến Home Assistant thành bảng theo dõi Plex đang phát gì và phim bộ nào sắp ra tập mới.
Trong hệ thống media server ở nhà, Plex là nơi xem phim, Sonarr là nơi theo dõi phim bộ, còn Home Assistant thường chỉ đóng vai trò điều khiển nhà thông minh. Nhưng nếu gom các thông tin này vào cùng một dashboard, Home Assistant trở thành một màn hình tổng quan rất hữu ích: biết ai vừa xem gì trên Plex, phim đang chạy tới đâu, thiết bị nào đang stream, và những tập phim nào sắp phát hành.
Đây là kết quả trên dashboard của mình:

Ý tưởng tổng thể
Luồng dữ liệu gồm hai phần độc lập:
- Current Playing: Tautulli theo dõi Plex, rồi gửi các thông tin như poster, tên phim, trạng thái phát, progress và chất lượng stream sang Home Assistant qua MQTT.
- Upcoming TV: Sonarr Upcoming Media tạo một sensor chứa lịch phát sóng sắp tới, sau đó Lovelace dùng
upcoming-media-cardđể render thành các poster ngang.
Sơ đồ đơn giản:
Plex Media Server
    |
    v
Tautulli
    |
    v
MQTT topics
    |
    v
Home Assistant MQTT sensors
    |
    v
Current Playing card

Sonarr calendar
    |
    v
Sonarr Upcoming Media sensor
    |
    v
Upcoming Media Card
Điểm hay của cách này là Home Assistant không cần tự gọi Plex API liên tục. Việc theo dõi playback giao cho Tautulli, còn Home Assistant chỉ đọc trạng thái đã được chuẩn hóa thành sensor.
Các thành phần cần có
Bạn cần chuẩn bị các thành phần sau:
- Plex Media Server đã chạy ổn.
- Tautulli đã kết nối được với Plex.
- MQTT broker trong Home Assistant, ví dụ Mosquitto.
- HACS để cài custom card.
custom:button-cardđể làm card Current Playing.card-modđể chỉnh poster nhỏ bên trong card.upcoming-media-cardđể hiển thị lịch phim sắp phát hành.- Custom integration
Sonarr Upcoming Medianếu muốn lấy lịch từ Sonarr.
Nếu bạn đã có media stack Plex, Radarr, Sonarr, Prowlarr và qBittorrent, phần này chỉ là lớp dashboard phía trên. Có thể xem bài nền trước: Tự động tải phim yêu thích về Plex bằng Watchlist, Radarr và qBittorrent.
Phần 1: Tạo sensor Plex từ MQTT
Trong cấu hình hiện tại của mình, Tautulli gửi nhiều MQTT topic nhỏ. Mỗi topic chỉ giữ một phần thông tin, ví dụ:
homeassistant/tautulli/image: poster và tên phim.homeassistant/tautulli/status: câu trạng thái kiểu(AFTMM) has stopped Jury Duty - Deliberations.homeassistant/tautulli/player: app hoặc thiết bị đang phát.homeassistant/tautulli/episode: thông tin season/episode.homeassistant/tautulli/activity: phần trăm progress và thông tin stream.
Trong configuration.yaml, khai báo các MQTT sensor như sau:
mqtt:
  sensor:
    - name: "Plex Media Playing"
      unique_id: "plex_media"
      state_topic: "homeassistant/tautulli/image"
      value_template: "{{ value_json.body }}"

    - name: "Plex Media Name"
      unique_id: "plex_media_name"
      state_topic: "homeassistant/tautulli/image"
      value_template: "{{ value_json.subject }}"

    - name: "Plex Activity"
      unique_id: "plex_activity"
      state_topic: "homeassistant/tautulli/status"
      value_template: "{{ value_json.subject }}"

    - name: "Plex Status"
      unique_id: "plex_status"
      state_topic: "homeassistant/tautulli/status"
      value_template: "{{ value_json.body }}"

    - name: "Plex Player"
      unique_id: "plex_player"
      state_topic: "homeassistant/tautulli/player"
      value_template: "{{ value_json.subject }}"

    - name: "Plex Player Device"
      unique_id: "plex_player_device"
      state_topic: "homeassistant/tautulli/player"
      value_template: "{{ value_json.body }}"

    - name: "Plex Playing Episode"
      unique_id: "plex_episode"
      state_topic: "homeassistant/tautulli/episode"
      value_template: "{{ value_json.body }}"

    - name: "Plex Playing Episode Name"
      unique_id: "plex_episode_name"
      state_topic: "homeassistant/tautulli/episode"
      value_template: "{{ value_json.subject }}"

    - name: "Plex Playing Progress"
      unique_id: "plex_progress"
      state_topic: "homeassistant/tautulli/activity"
      value_template: "{{ value_json.subject }}"

    - name: "Plex Resolution"
      unique_id: "plex_resolution"
      state_topic: "homeassistant/tautulli/activity"
      value_template: "{{ value_json.body }}"
Ở phía Tautulli, cấu hình Notification Agent dạng MQTT để publish JSON theo format đơn giản:
{
  "subject": "Jury Duty - Deliberations",
  "body": "https://your-plex-image-proxy.example/pms_image_proxy?img=/library/metadata/13289/thumb/1780883689"
}
Tùy topic, subject và body sẽ mang ý nghĩa khác nhau. Ví dụ topic image dùng subject làm tên phim và body làm poster URL. Topic activity dùng subject làm progress, còn body làm chuỗi chất lượng stream như 1080p → Direct Play → 1080.
Sau khi reload MQTT hoặc restart Home Assistant, kiểm tra trong Developer Tools. Các entity cần có dữ liệu là:
sensor.plex_media_playing
sensor.plex_media_name
sensor.plex_status
sensor.plex_playing_progress
sensor.plex_resolution
Nếu sensor.plex_media_playing trả về một URL ảnh, nghĩa là phần poster đã đúng.
Phần 2: Tạo card Current Playing
Card này dùng custom:button-card vì cần layout linh hoạt: poster bên trái, text bên phải, progress bar tự vẽ bằng HTML.
type: heading
heading: Current Playing
heading_style: title
icon: mdi:disc-player
Ngay dưới heading là card chính:
type: custom:button-card
custom_fields:
  picture:
    card:
      type: custom:button-card
      show_entity_picture: true
      entity_picture: |
        [[[
          return states['sensor.plex_media_playing'].state
        ]]]
      card_mod:
        style: |
          ha-card {
            box-shadow: none;
            border: none;
            padding: 0;
            margin: 0;
            width: 100px;
            height: 100px;
            border-radius: 12px;
            overflow: hidden;
          }
          img#icon {
            width: auto !important;
            height: 100% !important;
            object-fit: cover;
            border-radius: 12px;
          }
  intro: |
    [[[
      return states['sensor.plex_status'].state
    ]]]
  title: |
    [[[
      return states['sensor.plex_media_name'].state
    ]]]
  bar: |
    [[[
      let val = states['sensor.plex_playing_progress'].state;
      return `
        <div style="width: 100%; height: 18px; background: #2e2e2e; border-radius: 10px; overflow: hidden;">
          <div style="width: ${val}%; height: 100%; background: #e49f29; display: flex; align-items: center; justify-content: flex-end; padding-right: 8px; color: #fff; font-weight: bold; font-size: 12px;">
            ${val} %
          </div>
        </div>
      `;
    ]]]
  stream: |
    [[[
      return "Streaming at " + states['sensor.plex_resolution'].state
    ]]]
tap_action:
  action: more-info
  entity: sensor.plex_activity
styles:
  card:
    - height: auto
    - padding: 12px
    - border-radius: 16px
  custom_fields:
    picture:
      - grid-area: picture
      - margin-right: 12px
    intro:
      - text-align: left
      - font-size: 14px
      - font-weight: bold
      - color: "#e49f29"
    title:
      - text-align: left
      - font-size: 16px
      - margin-top: 4px
      - margin-bottom: 4px
    bar:
      - margin-top: 6px
      - margin-bottom: 6px
    stream:
      - text-align: left
      - font-size: 12px
      - color: "#cccccc"
  grid:
    - grid-template-areas: |
        "picture intro intro"
        "picture title title"
        "picture bar bar"
        "picture stream stream"
    - grid-template-columns: 100px 1fr
    - grid-template-rows: auto
Phần quan trọng nhất là custom_fields.picture.card.entity_picture. Nó lấy trực tiếp URL poster từ sensor.plex_media_playing, nên poster sẽ đổi theo phim đang phát hoặc phim vừa dừng.
Progress bar cũng không cần card riêng. Chỉ cần sensor sensor.plex_playing_progress là số phần trăm, button-card có thể render một thanh HTML nhỏ.
Phần 3: Lấy lịch phim sắp chiếu từ Sonarr
Để có danh sách như các card Widow's Bay, Cape Fear, Star City, mình dùng sensor:
sensor.tv_sonarr_upcoming_media
Sensor này đến từ custom integration Sonarr Upcoming Media. Sau khi cài qua HACS, bạn cấu hình kết nối tới Sonarr bằng URL và API key. Integration sẽ đọc calendar của Sonarr và tạo dữ liệu phù hợp với upcoming-media-card.
Khi sensor hoạt động, state thường là Online, còn attribute data chứa danh sách episode sắp phát hành. Mỗi item có các thông tin như:
{
  "title": "FROM",
  "episode": "Heavy Is the Head",
  "number": "S04E08",
  "airdate": "2026-06-15T01:00:00Z",
  "rating": "★ 7.8",
  "genres": "Drama, Horror, Mystery"
}
Phần 4: Hiển thị Upcoming Media Card
Phần Lovelace cho lịch phim sắp chiếu khá gọn:
type: custom:upcoming-media-card
entity: sensor.tv_sonarr_upcoming_media
title: null
image_style: fanart
sort_by: number
enable_tooltips: true
hide_empty: true
title_text: "$title"
line1_text: "$episode"
line2_text: "$number"
line3_text: "$day, $date $time"
line4_text: "$empty"
max: 5
Một vài tùy chọn đáng chú ý:
image_style: fanart: dùng ảnh ngang, hợp với layout dashboard dạng cột.hide_empty: true: ẩn card nếu không có tập nào sắp ra.max: 5: chỉ hiển thị 5 tập gần nhất để dashboard không quá dài.line1_text,line2_text,line3_text: quyết định nội dung text trên poster.
Nếu muốn hiển thị phim lẻ từ Radarr, cách làm tương tự: cài Radarr Upcoming Media, tạo sensor riêng, rồi thêm một custom:upcoming-media-card khác trỏ vào sensor Radarr.
Gợi ý layout trong dashboard
Trong dashboard của mình, phần media nằm ở một cột riêng:
- Heading
Current Playing. - Card Plex đang phát.
- Các media player nhỏ để điều khiển loa/TV.
- Một card log gần đây của Plex/Jellyfin.
- Cột bên phải là bandwidth và
upcoming-media-card.
Nếu màn hình tablet hoặc wall panel rộng, để Current Playing và Upcoming ở hai cột sẽ dễ nhìn hơn. Nếu dùng điện thoại, nên đặt Current Playing trước, Upcoming Media phía sau vì card upcoming chiếm chiều cao khá lớn.
Lỗi thường gặp
Poster không hiện
Kiểm tra state của:
sensor.plex_media_playing
Nó phải là một URL ảnh mà browser Home Assistant truy cập được. Nếu URL là địa chỉ nội bộ Plex có token hoặc domain HTTPS riêng, hãy kiểm tra chứng chỉ và quyền truy cập từ thiết bị đang mở dashboard.
Progress bar không chạy
Kiểm tra sensor.plex_playing_progress. Sensor này nên là số từ 0 đến 100. Nếu Tautulli gửi chuỗi có ký tự %, hãy xử lý lại payload hoặc template để chỉ còn số.
Upcoming card không có dữ liệu
Kiểm tra:
sensor.tv_sonarr_upcoming_media
Nếu state không phải Online, cần kiểm tra lại Sonarr URL, API key và calendar trong Sonarr. Nếu state Online nhưng không có card, xem attribute data có item nào không.
Card báo custom element không tồn tại
Lỗi này thường do thiếu HACS resource. Kiểm tra trong Home Assistant:
Settings → Dashboards → Resources
Cần có resource cho:
button-cardcard-modupcoming-media-card
Kết luận
Cách làm này không biến Home Assistant thành media server. Plex, Tautulli và Sonarr vẫn làm đúng vai trò của chúng. Home Assistant chỉ tổng hợp trạng thái thành một dashboard dễ nhìn.
Nhưng khi đặt lên tablet hoặc màn hình điều khiển trong nhà, cảm giác rất khác: bạn biết phim nào đang phát, phát tới đâu, thiết bị nào đang xem, và tuần này phim bộ nào sắp có tập mới. Với một homelab media server, đây là một trong những card đáng làm nhất.