
Reverse Proxy: Access Multiple Servers with One Public IP Using Caddy and Docker
You are setting up 2 computers at home (a Raspberry Pi and your PC) that both need to be accessed via a domain on ports 80 and 443. Keywords: docker, reverse proxy.
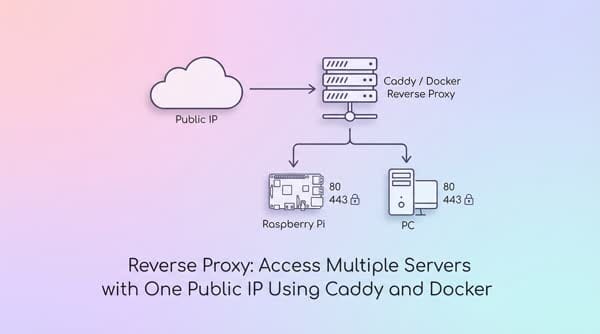
You are setting up 2 computers at home (a Raspberry Pi and your PC) that both need to be accessed via a domain on ports 80 and 443. However, you cannot configure the same public IP with those ports to access different servers, because they will constantly conflict over that single public IP. So what is the effective solution?
Your ISP only provides 1 IP address at a time. In the case where you need to expose a single server on ports 80 and 443, you simply need to set up NAT to open those ports. However, problems arise when you start setting up multiple services on the same server using the same ports, or different servers with different local IPs but the same ports. Your home network will not allow this. You need a mechanism in the middle to distribute incoming traffic: based on which domain is accessing the public IP, it will be routed to the corresponding local server IP to fetch data. This concept is called a reverse proxy, and there are many tools to implement it. Here I will introduce the simplest tool: Caddy.
Install Caddy with Docker
You can install Caddy in many ways following the guide here.
I choose to install with Docker so I can easily remove it when needed without affecting the system.
Create the compose.yml file
mkdir ~/caddy
cd ~/caddy
nano compose.yml
Enter the following content
services:
  caddy:
    image: caddy:2.7.6-alpine
    container_name: caddy
    restart: unless-stopped
    ports:
      - "80:80"
      - "443:443"
      - "443:443/udp"
    volumes:
      - ./Caddyfile:/etc/caddy/Caddyfile
      - ./html:/var/www/html
      - ./caddy_data:/data
      - ./caddy_config:/config
Create the Caddyfile file
nano CaddyfileCode language: Nginx (nginx)and temporarily enter the following content
:80 {
    respond "Hello, world!"
}
Activate Caddy
docker compose up -dOpen your browser and go to http://<IP>. If you see the text Hello, world!, it means Caddy has been installed and activated successfully.
Configure Caddy as a Reverse Proxy
To configure Caddy as a Reverse Proxy for Portainer running at 192.168.0.50:9000, I edit the Caddyfile and add the following 3 lines
portainer.thuanbui.me {
    reverse_proxy 192.168.0.50:9000
}
Then restart Caddy with the command
docker compose exec -w /etc/caddy caddy caddy reloadWait 1–2 minutes for Caddy to complete SSL certificate verification, and now I can access Portainer via https://portainer.thuanbui.me
In case Portainer and Caddy run on the same server, you can refer to the article below to learn how to put containers into the same Docker network and then edit the Caddyfile as follows
portainer.thuanbui.me {
    reverse_proxy portainer
}
P.s.: There are other tools to manage proxies with a UI. You can refer to this article: https://thuanbui.me/nginx-proxy-manager-reverse-proxy-openlitespeed-docker/