
Online meetings where you forget to turn on the mic and keep talking non-stop – everyone’s been there, right?
Having an online meeting, forgetting to unmute your mic, and talking non-stop – everyone’s experienced this feeling, right? 😅
Part 1: Why do you need this app?
😩 The pains of online meetings
When working remotely, online meetings are everyday stuff. But there are some “classic” situations that annoy everyone:
1. Forgetting to turn on the mic
You’re sharing your screen to demo for the team, passionately explaining for a full 5 minutes. Then you see your colleague type in chat: “Hey, I can’t hear anything.” 🤦♂️
2. Forgetting to turn off the mic
In the middle of a meeting, the sound of a barking dog, crying baby, or someone hammering away on the keyboard suddenly comes into the call. Everyone looks at each other not knowing where the sound is coming from.
3. Having to switch tabs to mute/unmute is annoying
When you’re sharing Chrome and want to mute your mic, you have to:
- Alt+Tab to Google Meet/Zoom
- Click the mic button
- Alt+Tab back to the screen you’re sharing
It breaks your workflow, ruins your focus, and sometimes you even end up sharing the wrong screen!
4. Wanting to walk/jog while in a meeting
AirPods have gesture control on iOS (tap the earbuds to mute/unmute). But on Mac? Nothing! Apple doesn’t allow it. So unfair!
💡 The solution: Audio Remote
I built an ultra-light macOS app to completely solve these problems:
- 📱 Turn the mic on/off from your phone – no need to install an app, just be on the same WiFi
- 🔊 Synced volume – tap the back of your phone to change your Mac’s volume
- 🖥️ Center-screen HUD – instantly see whether you’re muted or unmuted
- ⌨️ System-wide shortcut – ⌘M to toggle the mic, works everywhere
- ⚡ Super fast – only ~1ms latency

Goal: Everyone gets a “0đ Stream Deck” – remote control for your Mac without spending a cent! 😉
Remote volume control feature
I also needed a way to adjust app volume from my phone, so I went ahead and added a feature where tapping the back of the phone will sync the volume with the computer.
Download the extra volume control shortcut here:
👉 Download Audio Remote
Part 2: Step-by-step installation guide
Don’t worry if you’re not tech-savvy – I’ll walk you through step by step, from A to Z!
Step 1: Download and install the app on your Mac
1.1. Download the app
Go to the following link and download the AudioRemote.dmg file:
Click the latest .dmg file (for example: AudioRemote-v2.4.0.dmg)
1.2. Installation
- Open the
.dmgfile you just downloaded - Drag the Audio Remote icon into the Applications folder
- Go to Applications and double-click to open the app
1.3. What to do if macOS blocks the app
If you see the message “App can't be opened because it is from an unidentified developer”:
- Open Terminal (how to open it: press
Cmd + Space, typeTerminal, press Enter) - Copy and paste the following command into Terminal:
xattr -cr /Applications/AudioRemote.app
- Press Enter
- Close Terminal and open the app again
1.4. Grant Microphone permission
When the app asks for Microphone access → Click Allow
If you accidentally clicked Deny, go to System Settings → Privacy & Security → Microphone → Enable Audio Remote
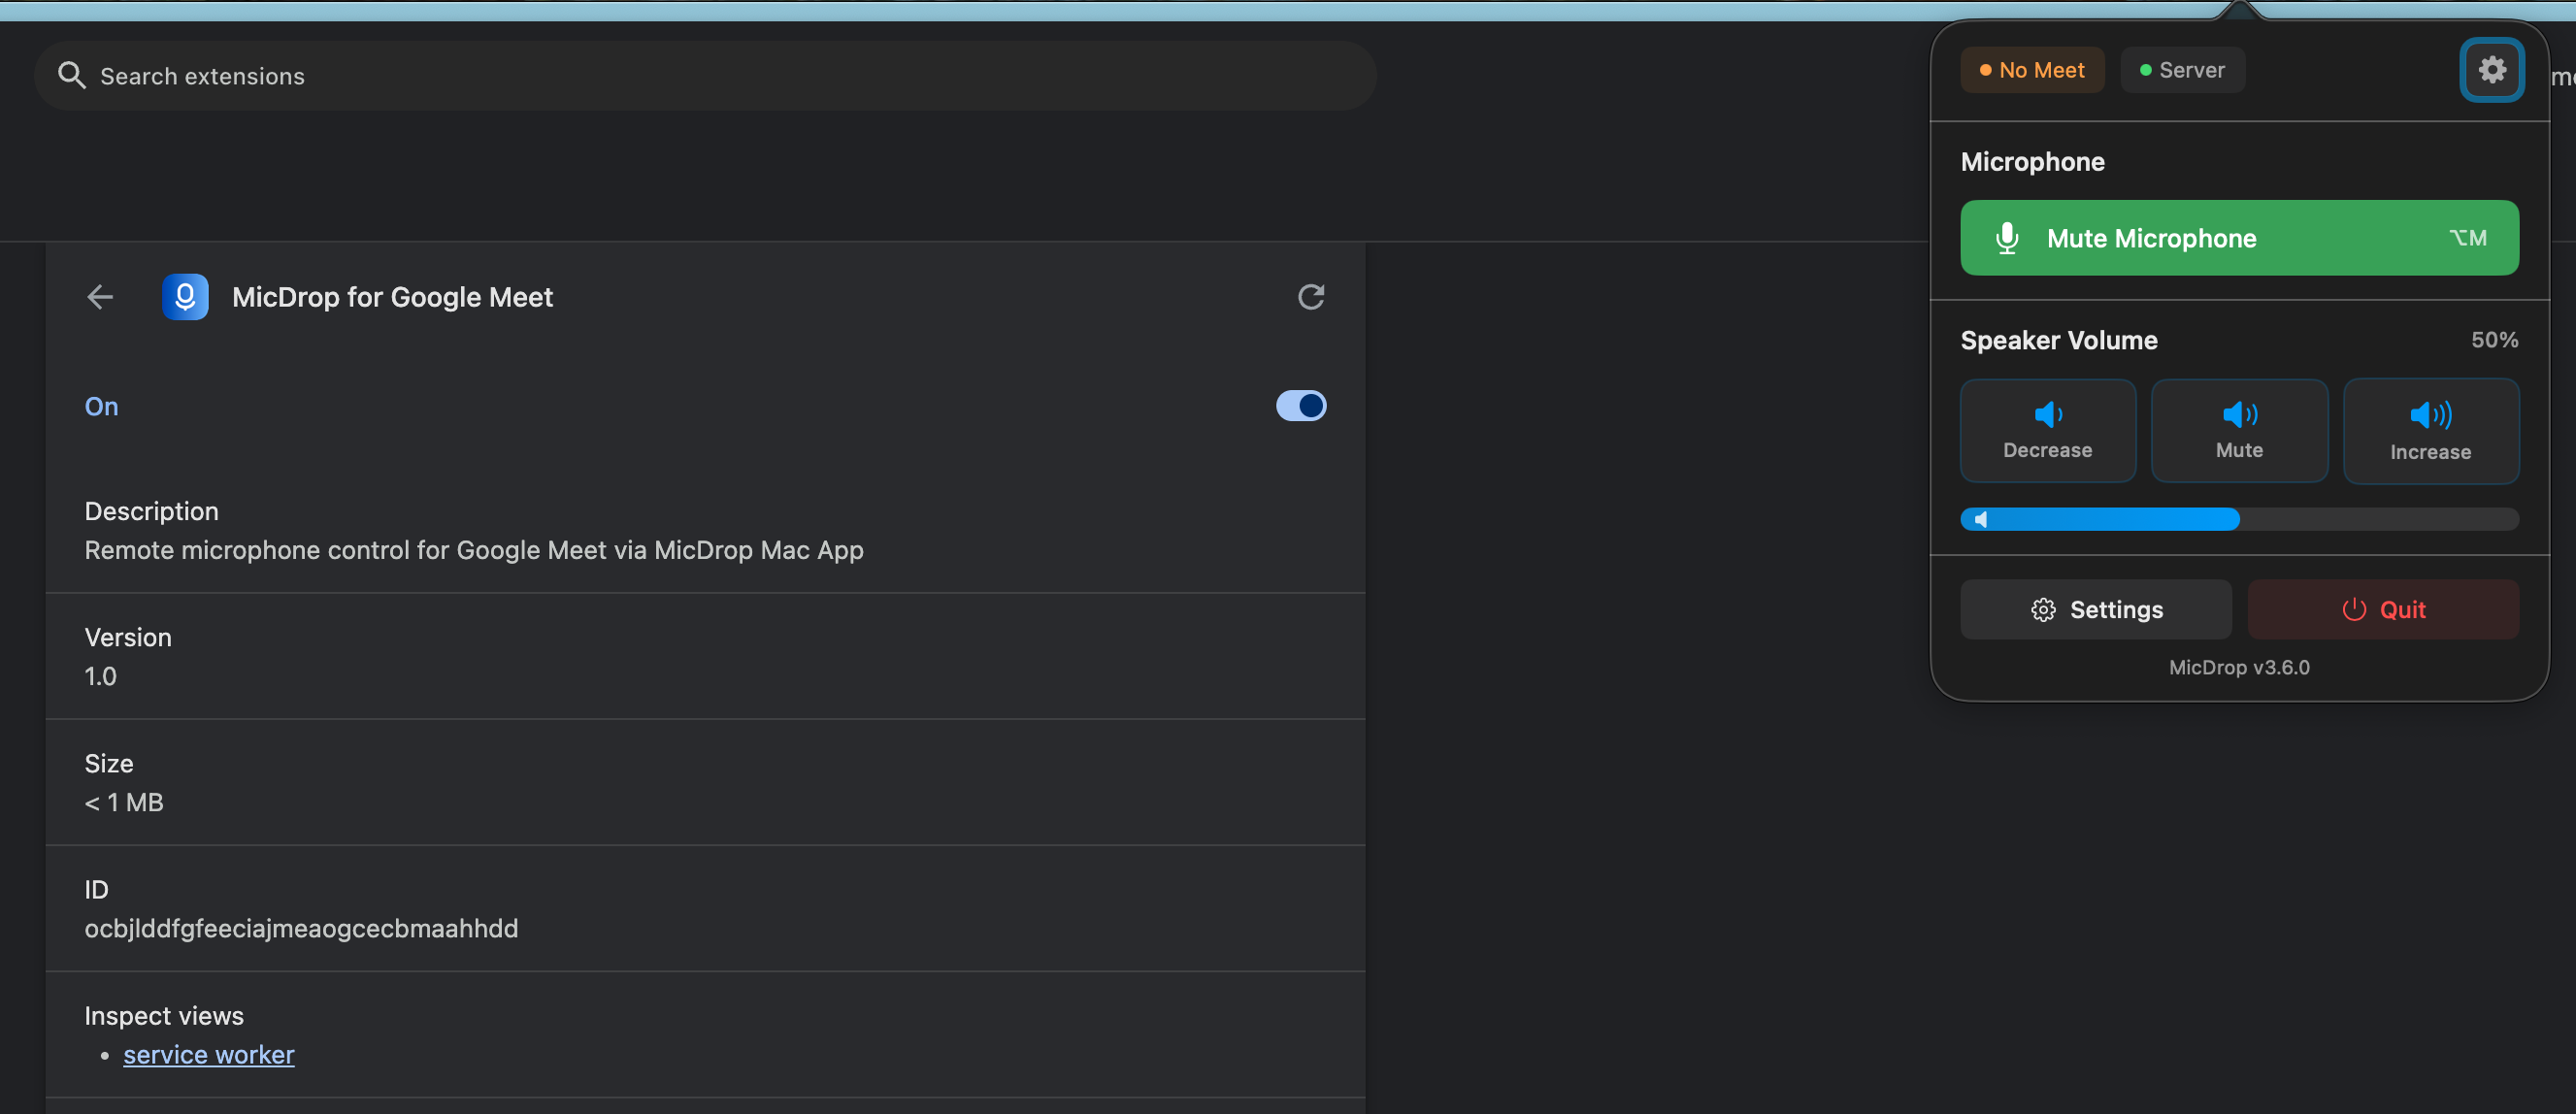
1.5. Install the browser extension
After trying many methods to mute the whole system’s audio, I still couldn’t fully succeed. Most apps auto-adjust the input level, so it’s impossible to completely mute. Instead, I switched to implementing muting via a browser plugin.
Install this plugin and it will automatically connect to the desktop app to perfectly control mic toggling. It also disables mic and camera by default when you join Google Meet.
Step 2: Turn on the HTTP Server and get your IP address
2.1. Turn on the HTTP Server
- Look at the menu bar (top right corner of the screen) → you’ll see a 🎤 icon
- Click that icon → Choose Settings...
- Find the HTTP Server section → Switch it ON
2.2. Get your Mac’s IP address
Still in the Settings window, look under Network Info → Note down the IP address (for example: 192.168.1.100)
💡 Tip: This IP is what your phone will use to send commands to your Mac. Make sure to write it down!
Step 3: Set up iOS Shortcuts on your iPhone
This is the most important step! You’ll download 2 ready-made shortcuts and only need to change the IP address.
3.1. Download the “Toggle Mic” Shortcut
- On your iPhone, open the following link in Safari:
👉 Download the Toggle Mic Shortcut
- Tap Get Shortcut (or Add Shortcut)
- The shortcut will be added to the Shortcuts app
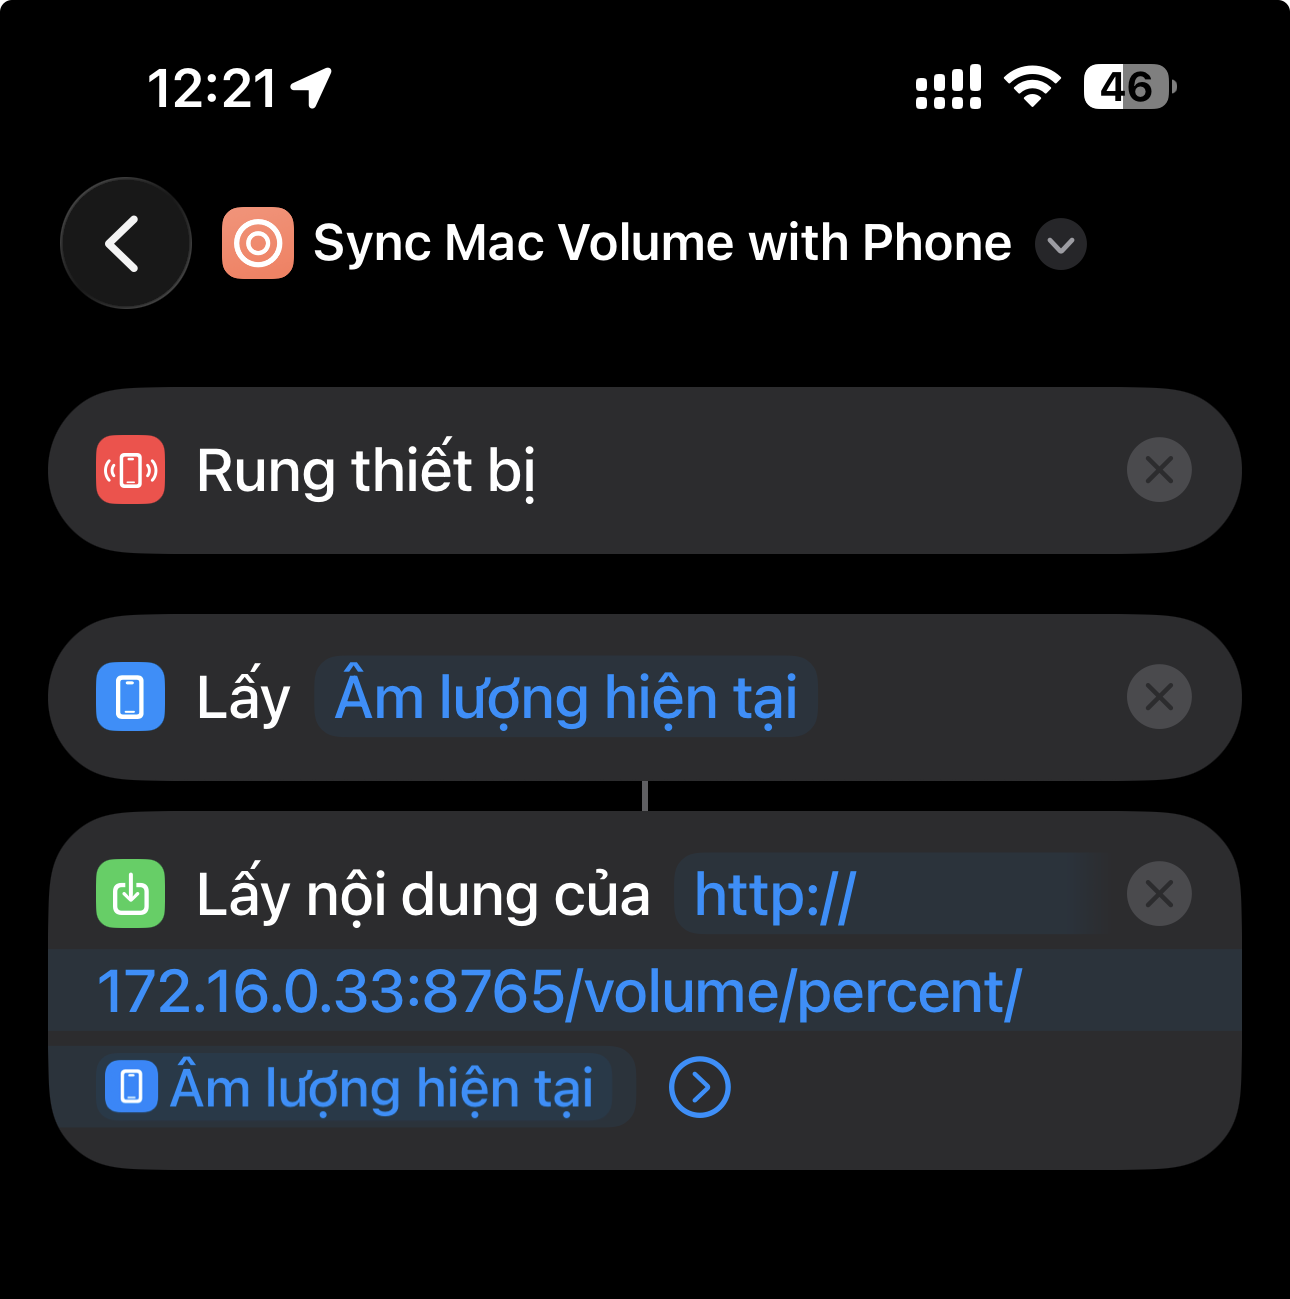
3.2. Download the “Sync Volume” Shortcut
- On your iPhone, open this link:
👉 Download the Sync Volume Shortcut
- Tap Get Shortcut
Step 4: Change the IP address in the Shortcuts
After downloading the shortcuts, you need to replace the default IP address with your Mac’s IP.
4.1. Edit the “Toggle Mic” Shortcut
- Open the Shortcuts app on your iPhone
- Find the shortcut you just downloaded (its name might be “Toggle Mac Mic”)
- Tap the three dots (⋯) in the corner of the shortcut to edit
- Find the line with a URL like:
http://YOUR_MAC_IP:8765/toggle-mic - Replace
YOUR_MAC_IPwith your actual Mac IP (for example:192.168.1.100) - Result:
http://192.168.1.100:8765/toggle-mic - Tap Done
4.2. Edit the “Sync Volume” Shortcut
Do the same with the Sync Volume shortcut – replace YOUR_MAC_IP with your Mac’s IP.
Step 5: Add the Shortcuts to your Home Screen or Back Tap
Method 1: Add to Home Screen
- Open the shortcut → Tap the three dots (⋯)
- Tap the info icon (i) in the top right corner
- Select Add to Home Screen
- Set a name and choose an icon
- Tap Add
Now you can tap once on your Home Screen to toggle the mic!
Method 2: Assign to Back Tap (tapping the back of the phone)
This is the coolest way – double-tap the back of your phone to mute/unmute!
- Open Settings on your iPhone
- Go to Accessibility → Touch → Back Tap
- Select Double Tap
- Scroll down to the Shortcuts section → Select Toggle Mac Mic
Now double-tapping the back of your iPhone = toggling the mic on your Mac! 🎉
Method 3: Use Siri
You can say: “Hey Siri, Toggle Mac Mic” to mute/unmute the mic!
Step 6: Test it out!
- Make sure your iPhone and Mac are on the same WiFi network
- Start a Google Meet/Zoom call
- Double-tap the back of your iPhone (or tap the shortcut on the Home Screen)
- Look at your Mac’s screen → you’ll see a HUD showing the mic status
- The mic will be toggled on/off!
🆘 Troubleshooting
Shortcut isn’t working?
- Check they’re on the same WiFi: iPhone and Mac must be on the same WiFi network
- Check if the IP is correct: Open the Settings window on your Mac → check the IP again
- Check if the HTTP Server is on: Settings → HTTP Server must be ON
- Test via Safari: On your iPhone, open Safari and enter
http://[YOUR-MAC-IP]:8765→ If you see a web interface, it’s working
What if the IP changes?
If your router assigns dynamic IPs, restarting it might change your Mac’s IP. You’ll need to:
1. Open the Settings window on your Mac → check the new IP
2. Update the shortcuts with the new IP
Tip: Configure a static IP for your Mac in the router so the IP doesn’t change.
📥 Download
I found it so convenient for myself that I’m sharing it for everyone to use for FREE!
P/S: The in-app auto-update is still a work in progress; the free version keeps failing and I haven’t fixed it yet. I’ll come back to it when I’ve learned enough 😅
Please feel free to download, try it out, and share your feedback!
Made with ❤️ for macOS users