WebAI-to-API: Turn Gemini Web into an API for n8n and Home Assistant
How to run WebAI-to-API as a free AI model API endpoint, configure it from the web UI, then use it in n8n and Home Assistant as an OpenAI-compatible service.
If you use n8n, Home Assistant, Open WebUI, or personal automations and want a free AI model API, leolionart/WebAI-to-API is worth trying.
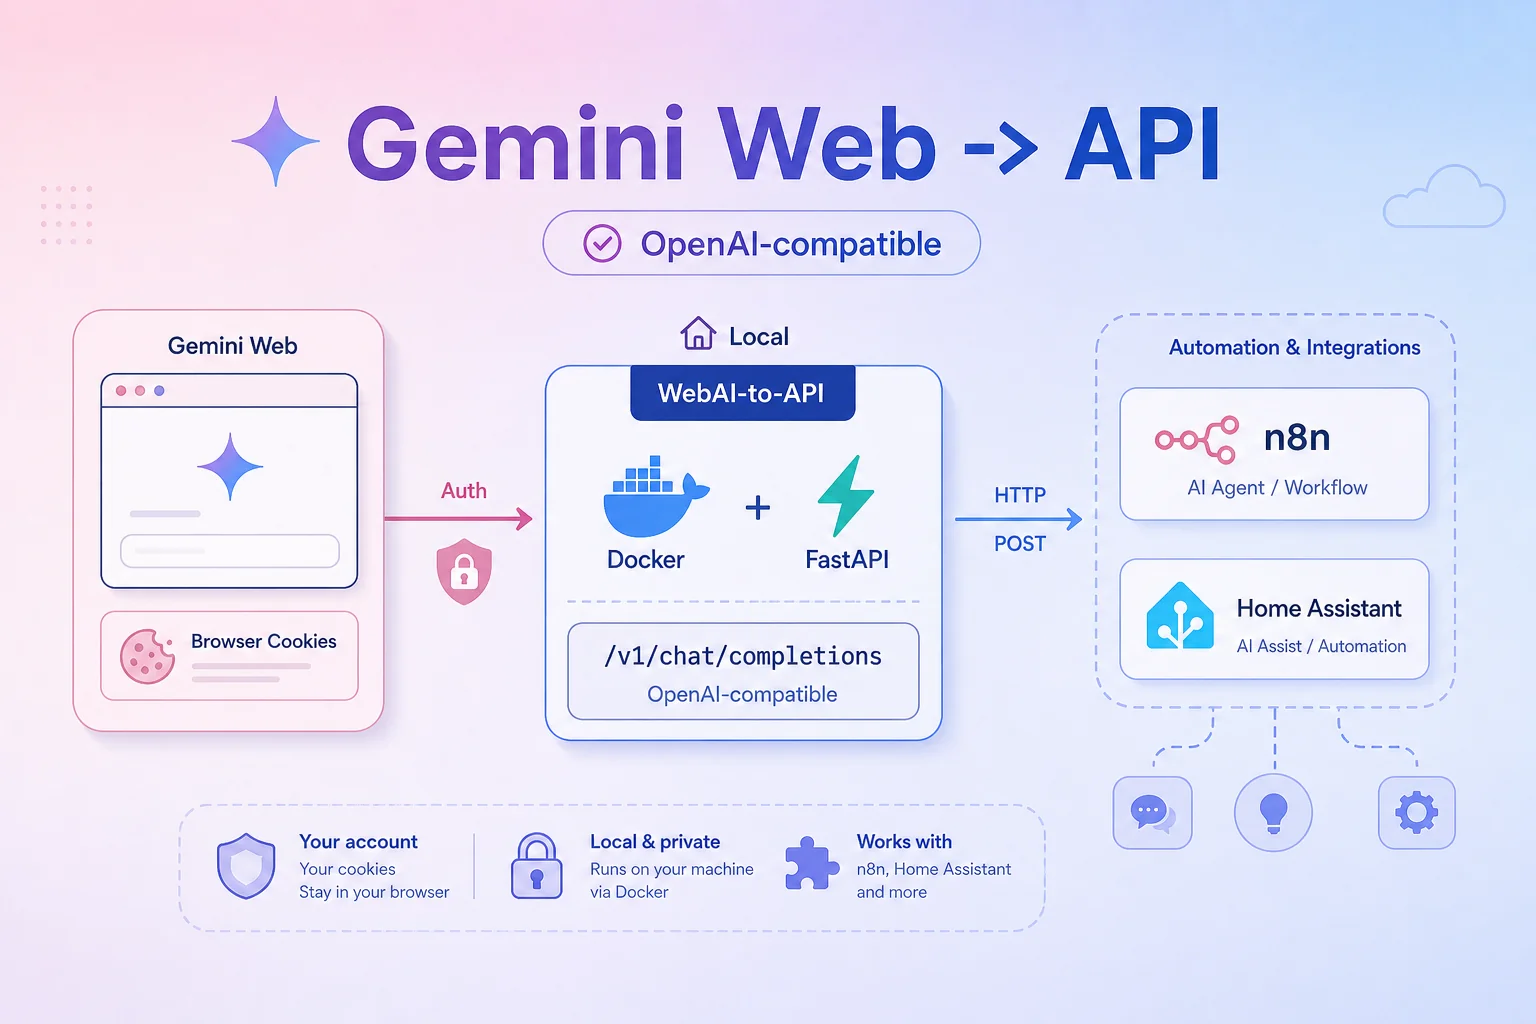
In simple terms: you run a WebAI-to-API service on your own machine, connect it to a logged-in Gemini Web account, and then other tools can use it through an OpenAI-compatible endpoint:
Base URL: http://WEBAI_HOST_IP:6969/v1
API Key: not-needed
Model: gemini-3.0-flash
This article does not focus on the repository internals. The goal is a non-coder-friendly setup: run the service, open the admin UI, paste cookies with a browser plugin, then configure n8n and Home Assistant from their web interfaces.
What you get after setup
After setup, WebAI-to-API acts as a Gemini Web API gateway:
- Connect your Gemini account once in the admin UI.
- The service keeps the login session for later requests.
- Telegram notification can alert you when the login session is lost.
- n8n can use it through an OpenAI credential with a custom base URL.
- Home Assistant can use it through the Local OpenAI LLM integration installed from HACS.
For personal automation, start with:
gemini-3.0-flash
It is fast enough for webhook summaries, email classification, Telegram notification writing, JSON extraction, smart-home state summaries, and camera-alert analysis.
Install WebAI-to-API
The easiest path is Docker Compose. Create a new folder:
mkdir webai-to-api
cd webai-to-api
mkdir data
Create docker-compose.yml:
services:
  web_ai:
    image: ghcr.io/leolionart/webai-to-api:latest
    container_name: web_ai_server
    restart: always
    ports:
      - "6969:6969"
    environment:
      - PYTHONPATH=/app/src
      - CONFIG_PATH=/app/data/config.conf
    volumes:
      - ./data:/app/data
    command: uvicorn app.main:app --host 0.0.0.0 --port 6969 --workers 1 --log-level info
Start the service:
docker compose up -d
Open the configuration UI:
http://WEBAI_HOST_IP:6969/admin
If you open it on the same machine that runs the service, you can use:
http://localhost:6969/admin
The important point: the main service configuration is done from the admin UI. The data folder is only where the service persists settings after you save them, so you do not need to edit configuration files by hand.
Get Gemini cookies with Copy Cookies for Chrome
This is the most important step, but it can still be done with a browser extension and the web UI.
Steps:
- Install Copy Cookies from the Chrome Web Store.
- Pin the extension to the Chrome toolbar so it is easy to access.
- Open gemini.google.com and log in.
- While you are on the Gemini page, click the Copy Cookies icon and copy the cookies for the current site.
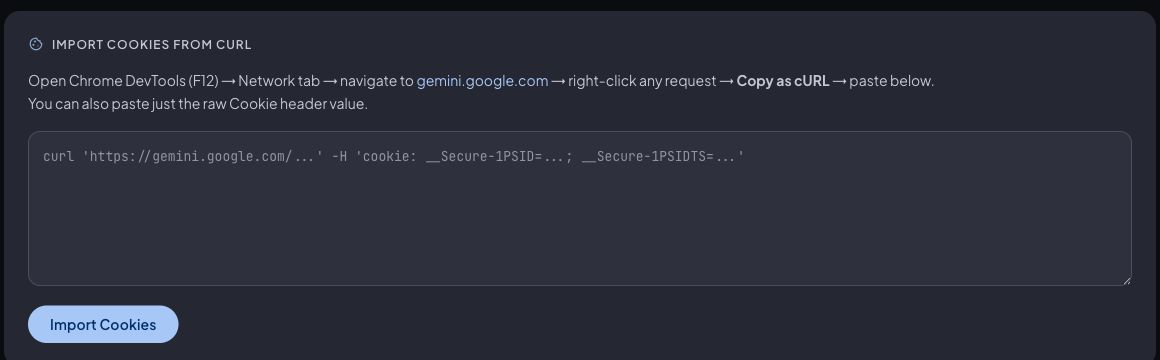
- Open the WebAI-to-API dashboard at
http://WEBAI_HOST_IP:6969/admin. - Go to Configuration.
- In Import Cookies from cURL, paste the cookie string you copied. This field accepts a raw Cookie header value, so you do not have to use Chrome DevTools or paste a full cURL command.
- Click Import Cookies.
- Check Cookie Status. If it shows Configured and masked cookies such as
__Secure-1PSIDand__Secure-1PSIDTS, the dashboard has accepted the cookies. - In Model, choose
gemini-3.0-flashand click Save if it is not already selected.
The UI also has Manual Cookie Entry, but with Copy Cookies the quickest path is to paste directly into Import Cookies from cURL. Do not put these cookies in chat, logs, Git, or screenshots because they can grant access to your Gemini login session.
After a successful connection, you do not need to repeat this for every workflow run. The service stores the session and reuses it for later requests. You only need to paste fresh cookies again if Google asks you to log in, you change the password, you log out, or the cookie expires.
Enable Telegram notification for lost login
In the WebAI-to-API dashboard, open Configuration and find Telegram Notifications. Fill in:
Bot token: your Telegram bot token
Chat ID: the chat or group that should receive alerts
Cooldown: seconds between repeated alerts
Enable Enable notifications, then choose the events under Notify on error types. At minimum, enable Auth / Cookie expired so you know when the Gemini session expires. If you want more operational alerts, also enable Stream error (503) and Server error (500).
Click Save. You can use Send Test to verify that the bot token and chat ID can receive messages.
This is useful because the service can run quietly for a long time, but if Gemini loses the login session, you want to know quickly and paste a fresh cookie in the dashboard.
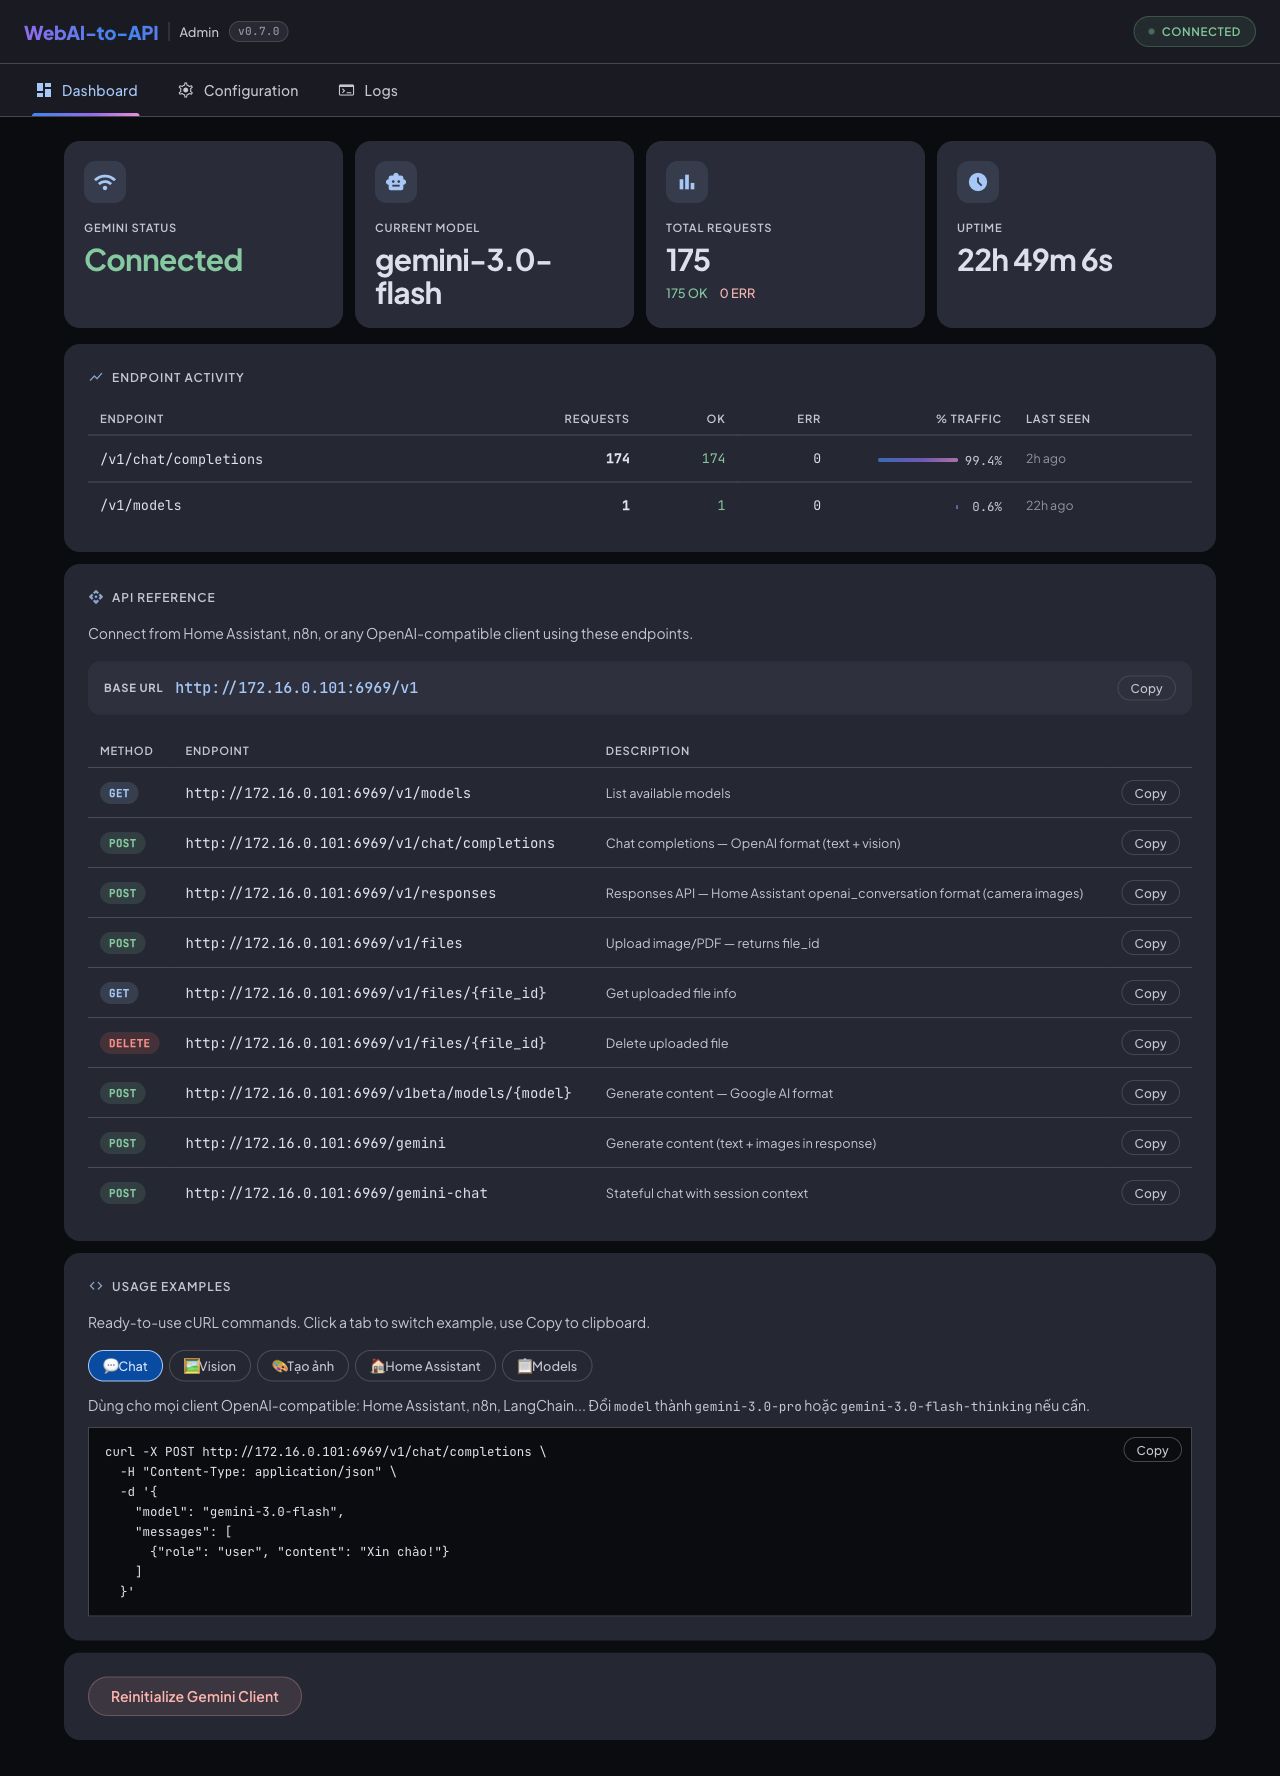
Quick dashboard test
After importing cookies, return to Dashboard. If the top status shows Gemini Status: Connected and Current Model: gemini-3.0-flash, the basic configuration is good.
The Dashboard includes API Reference and Usage Examples. Use the Chat example to copy a sample cURL request for:
http://WEBAI_HOST_IP:6969/v1/chat/completions
If the cURL example returns a model response, the endpoint is ready for n8n or Home Assistant. If you just changed cookies or model settings and the service does not pick them up immediately, use Reinitialize Gemini Client on the Dashboard.
Configure n8n with an OpenAI credential
In n8n, configure WebAI-to-API as an OpenAI-compatible service.
In n8n:
- Open Credentials.
- Click New credential.
- Choose OpenAI API.
- For API key, enter:
not-needed
- Open the base URL/custom base URL option.
- Enter:
http://WEBAI_HOST_IP:6969/v1
- Save the credential.
When building a workflow, use AI nodes such as OpenAI Chat Model, AI Agent, or any n8n node that lets you select an OpenAI credential. Choose the credential you just created, then enter this model:
gemini-3.0-flash
Good workflow examples:
- Webhook receives data -> AI summarizes it -> send Telegram.
- New email -> AI classifies urgent/non-urgent -> create task.
- Google Sheet rows -> AI writes product descriptions.
- Error log -> AI summarizes the likely cause -> send alert.
- JSON payload -> AI extracts clean fields for the next step.
If n8n runs in Docker or on another machine, avoid using localhost by habit. Use the LAN IP of the machine running WebAI-to-API, for example 192.168.1.10.
Configure Home Assistant through HACS
For Home Assistant, use leolionart/hass_local_openai_llm. You can do the setup from the UI.
In Home Assistant:
- Open HACS.
- Go to Integrations.
- Open Custom repositories.
- Paste this repository:
https://github.com/leolionart/hass_local_openai_llm
- Set category to Integration.
- Download the integration.
- Restart Home Assistant.
After restart:
- Go to Settings -> Devices & services.
- Click Add integration.
- Search for Local OpenAI LLM.
- Fill in the server information:
Server Name: Gemini Free API
Server URL: http://WEBAI_HOST_IP:6969/v1
API Key: not-needed
Then choose gemini-3.0-flash wherever the integration, Assist, or AI task UI allows model selection.
You can use this endpoint for:
- Assist or an internal conversation agent.
- Morning smart-home state summaries.
- Camera snapshot analysis before sending alerts.
- More natural TTS announcements.
- Automation log and alert summaries.
On Geek Playground I previously wrote about AI-Powered Home Assistant smart shipper detection with LLM. WebAI-to-API can be the free model endpoint for similar automations.
Useful commands
You only need a few basic commands:
docker compose up -d
docker compose logs -f
docker compose restart
docker compose pull && docker compose up -d
docker compose down
If the API stops responding, check in this order:
- Is the container still running?
- Can you open the admin dashboard?
- Is the Gemini cookie still logged in?
- Did Telegram notification report a lost session?
- Are n8n and HASS pointing to the correct WebAI-to-API machine IP?
Safety notes
- Do not share this endpoint with other people.
- Do not put Gemini cookies in chat, Git, logs, or screenshots.
- Do not expose port
6969directly to the Internet. - Use this for homelab, personal automation, experiments, and internal workflows.
- If you need clear SLA, quota, billing, or production support, use an official API.
When to use it
Use it when:
- You need a free AI model API for personal automation.
- You run n8n or Home Assistant in a homelab.
- You want to configure it once and reuse it across workflows.
- You accept occasionally pasting fresh cookies when Gemini loses login.
Avoid it when:
- You need a stable long-term production system.
- You plan to expose the API to many users.
- You do not want to use browser cookies.
- You need an official provider-supported integration.
Related reading
- Configure CLIProxyAPI in OpenClaw
- AI-Powered Home Assistant smart shipper detection with LLM
- Home Assistant opens a new world for IoT
- Use Claude Code to normalize OpenClaw configuration