Using CLI Proxy API to Optimize AI Costs and Integrations
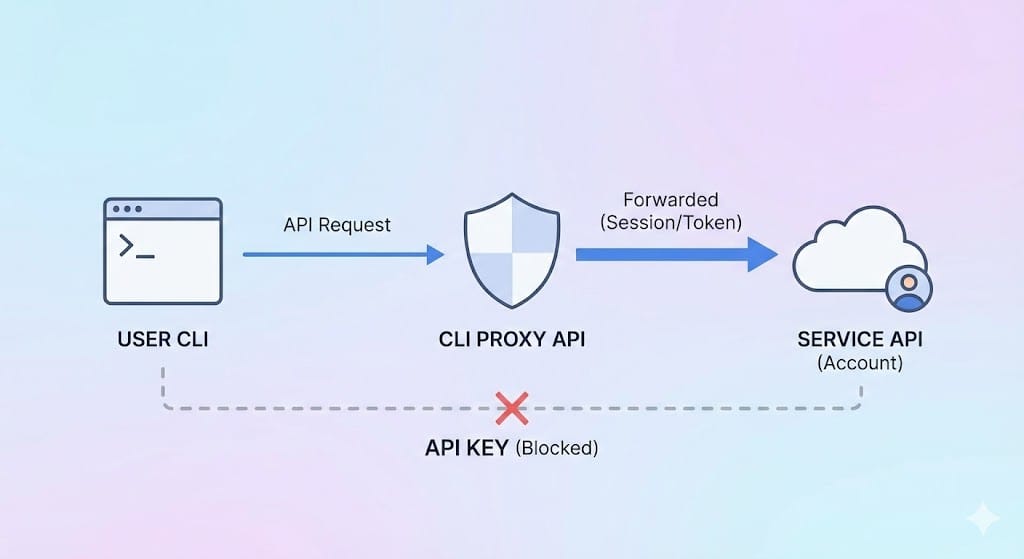
The current issue is that many providers like Google, OpenAI, and Claude separate regular subscription plans from API calls, especially calls via CLI tools (using AI in the terminal). This means you cannot truly optimize the monthly cost you pay for all your different tasks. This project was created to help solve that problem by simulating an environment so you can forward all requests, whether from CLI or from API (such as n8n), through your account to make full use of the plan you have purchased.
What is CLI Proxy API?
CLI Proxy API works as a "proxy server that connects CLI models with an API setup", making them compatible with platforms like OpenAI, Gemini, and Claude. Instead of manual terminal commands, developers can use standard API requests.
Main Features:
- Multi-platform Support: Compatible with OpenAI, Gemini, and Claude endpoints.
- Flexible Responses: Supports both streaming (real-time) and non-streaming outputs.
- Smart Tools: Allows function calls and tool integrations.
- Image Support: Accepts image input in addition to text.
- Multi-account Management: Handles multiple accounts concurrently with load balancing.
How to Install CLI Proxy API
Installation Steps
Clone the Repository
Open the terminal and run:
git clone https://github.com/luispater/CLIProxyAPI.git
cd CLIProxyAPI
go build -o cli-proxy-api ./cmd/server
This command creates the cli-proxy-api file in your directory.
Or for MacOS users, just do this for convenience
Compile the source code into an executable file:
brew install cliproxyapi
brew services start cliproxyapi
If there is some copy bug or error, just ask an AI for more guidance, or chat with the AI in the corner of my screen and it will guide you.
How to Configure CLI Proxy API: Basic Steps
Step 1: Log In
Authenticate with your Google account:
./cli-proxy-api --login
Step 2: Start the Server
Start the proxy server (default port is 8317):
./cli-proxy-api
Step 3: Make API Calls
Start a Chat:
Send a POST request to http://localhost:8317/v1/chat/completions
{
  "model": "gemini-2.5-pro",
  "messages": [
    {
      "role": "user",
      "content": "Hello, how are you?"
    }
  ],
  "stream": true
}
List Available Models:
GET http://localhost:8317/v1/models
Customizing CLI Proxy API
The configuration is managed via a YAML file (default: config.yaml). To specify a different file:
./cli-proxy-api --config ~/CLIProxyAPI/config.yaml
Wherever you cloned this project, go there to edit the file; or if you installed via brew, just use the command above.
Sample config.yaml:
port: 8317
remote-management:
allow-remote: true
auth-dir: "~/.cli-proxy-api"
debug: false
proxy-url: ""
quota-exceeded:
switch-project: true
switch-preview-model: true
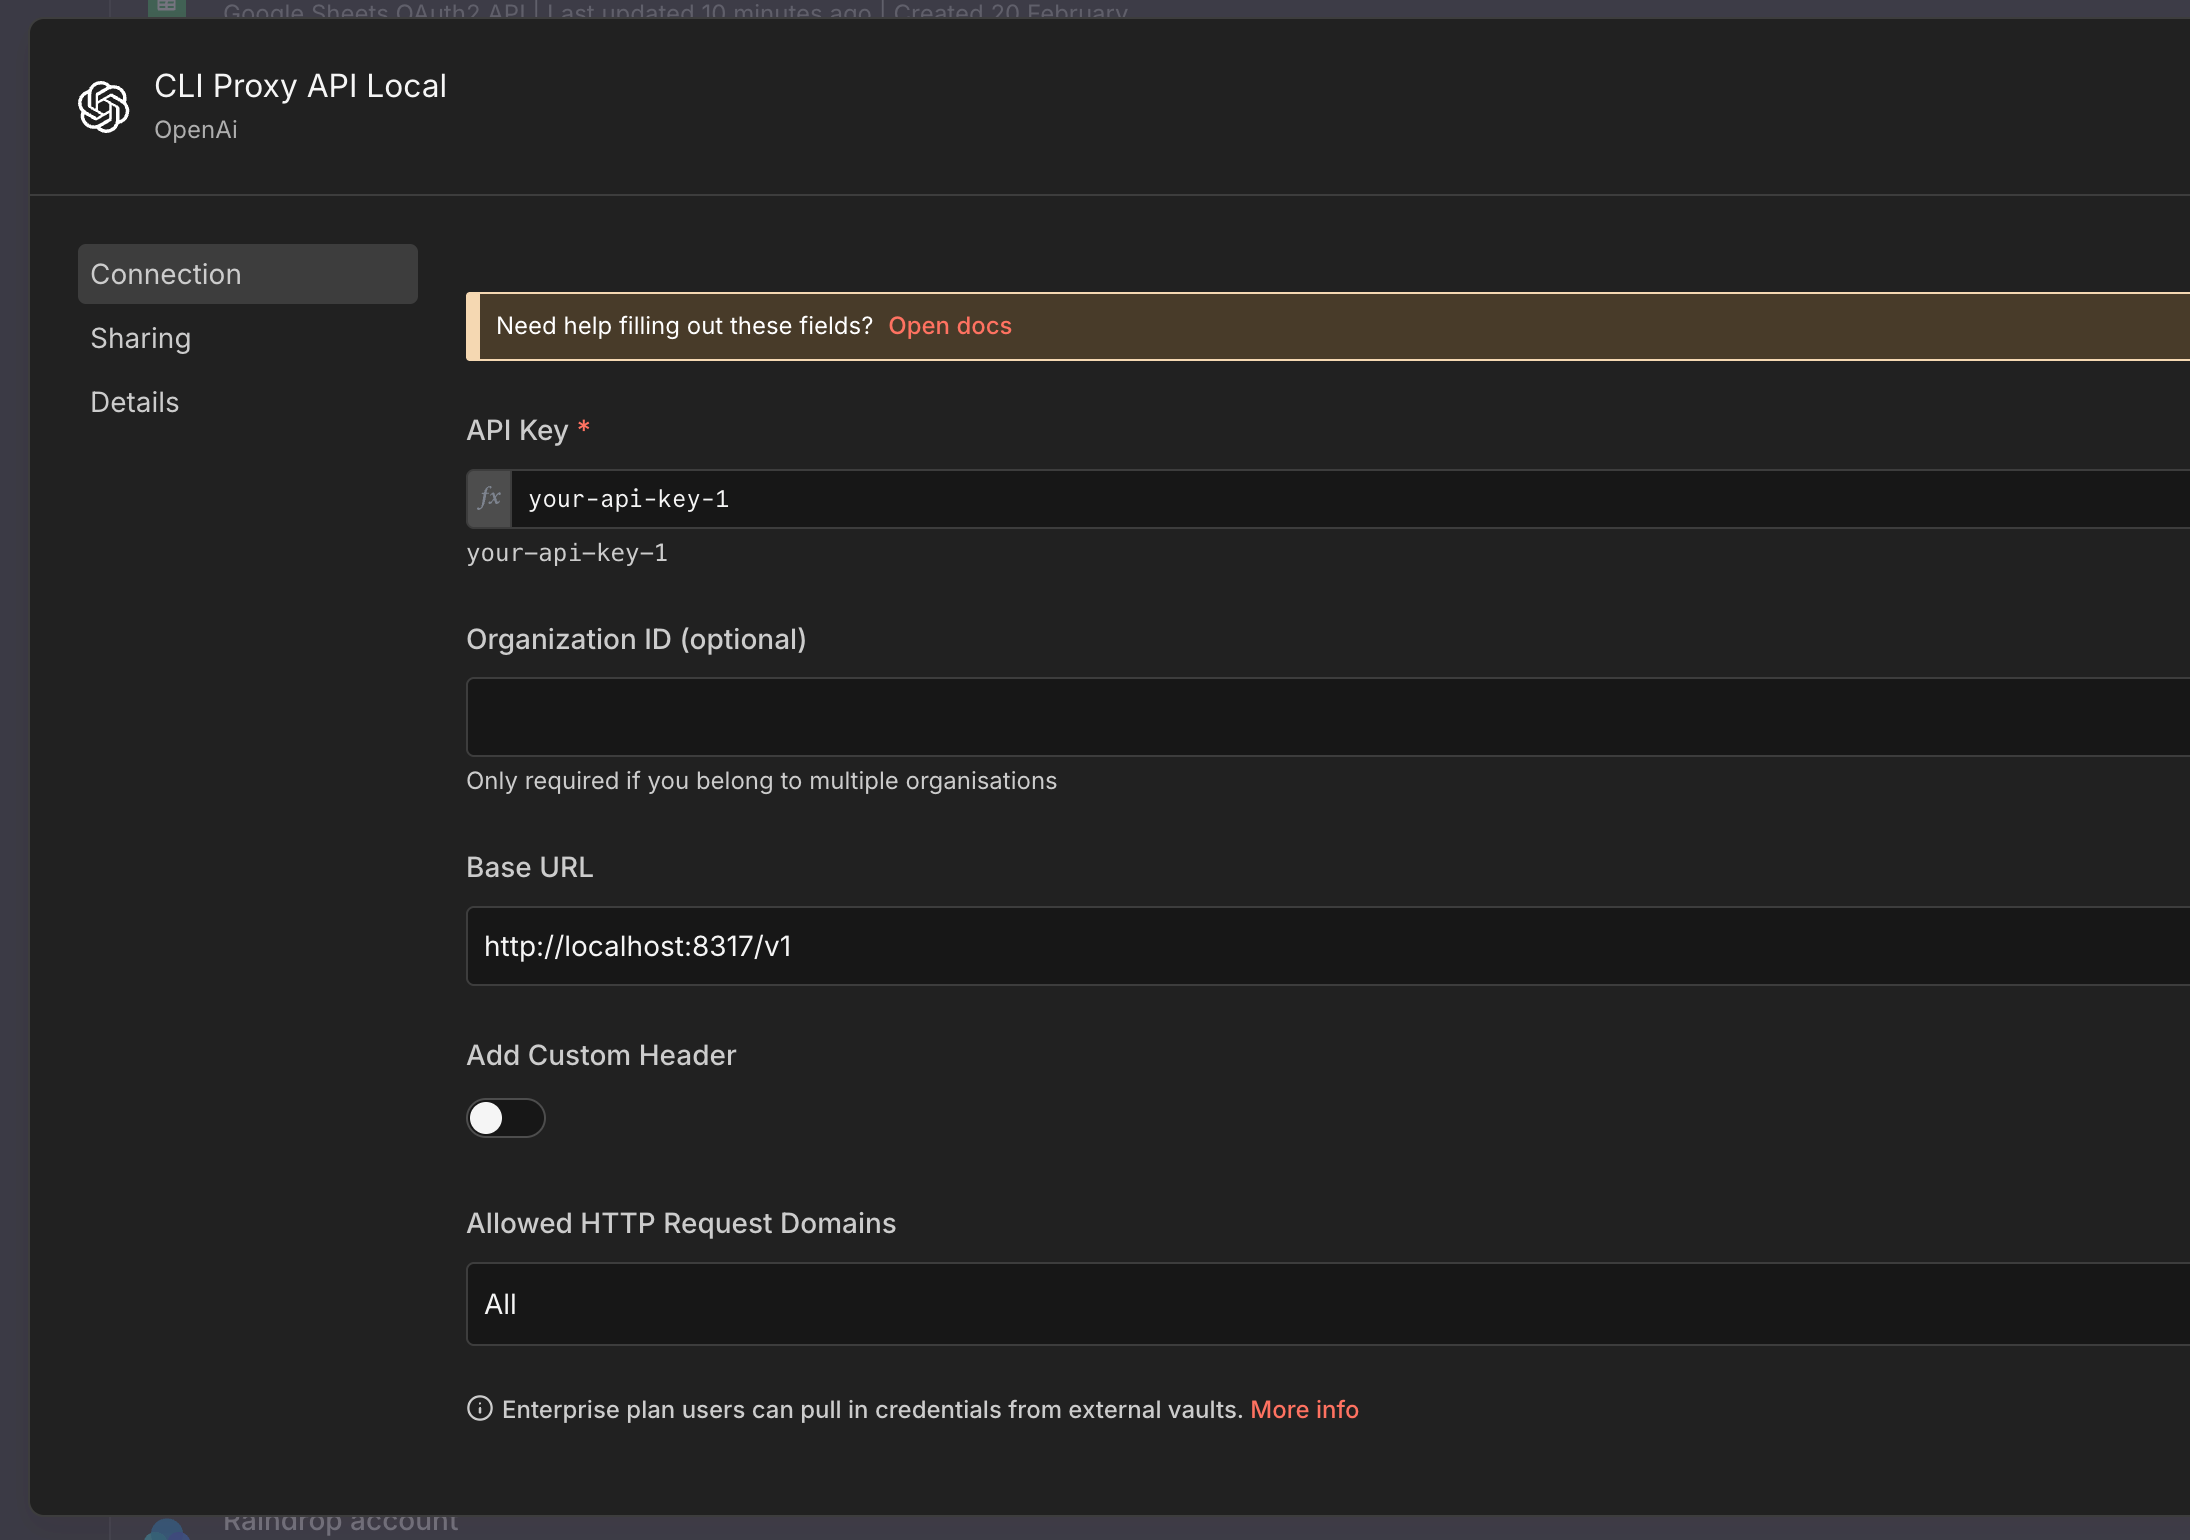
api-keys:
- "your-api-key-1"
- "your-api-key-2"
generative-language-api-key:
- "AIzaSy...01"
- "AIzaSy...02"
Advanced Features
You can also deploy this on Docker on a VPS server to conveniently access it from multiple computers. You can see the details here:
However, I recommend installing it on your own machine for security and easier authentication (granting access) to your accounts. Then download the Auth file and upload it to the environment where you installed via Docker—that is the easiest way.
Docker Deployment
Log in:
docker run --rm -p 8085:8085 -v /path/to/your/config.yaml:/CLIProxyAPI/config.yaml -v /path/to/your/auth-dir:/root/.cli-proxy-api eceasy/cli-proxy-api:latest /CLIProxyAPI/CLIProxyAPI --login
Start the Server:
docker run --rm -p 8317:8317 -v /path/to/your/config.yaml:/CLIProxyAPI/config.yaml -v /path/to/your/auth-dir:/root/.cli-proxy-api eceasy/cli-proxy-api:latest
Add CLI Proxy API to n8n
Currently, no matter what AI model you use, you must still use OpenAI and the OpenAI nodes to configure, because only these support the protocol that the project author is leveraging.
If your n8n instance is hosted on a VPS (i.e., outside your LAN), you need to expose CLI Proxy API on a domain to connect. Or if accessing within a LAN but n8n and the Proxy are installed on different machines, you must enter the correct IP of the proxy server machine in the Base URL step.
After that, just attach it to the AI nodes to chat as usual; you can also send images.
Using It to Generate Images
This part is a bit more complex; you can only call it via an HTTP Request node with the following settings:
POST method: https://your-proxy-domain/v1/chat/completions
Remember to replace it with your proxy domain link or local IP.
Send Header:
AuthorizationBearer your-api-key-1
Body:
{
  "model": "gemini-2.5-flash-image",
  "messages": [
    {
      "role": "user",
      "content": "{{ $json.prompt }}"
    }
  ],
  "modalities": ["image", "text"],
  "image_config": {
    "aspect_ratio": "16:9"
  }
}
After you receive the response, the image will be in base64 format, so you need an additional intermediate conversion step. Below I am sharing a sample workflow; you can copy the code above and paste it directly into your workflow in n8n to understand it.
Sample Workflow (containing HTTP request and conversion):
{
  "name": "Sample Generate Image via ProxyAPI",
  "nodes": [
    {
      "parameters": {
        "method": "POST",
        "url": "={{ $json.proxy_url }}",
        "sendHeaders": true,
        "headerParameters": {
          "parameters": [
            {
              "name": "Authorization",
              "value": "=Bearer {{ $json.api_key }}"
            }
          ]
        },
        "sendBody": true,
        "specifyBody": "json",
        "jsonBody": "={\n  \"model\": \"gemini-2.5-flash-image\",\n  \"messages\": [\n    {\n      \"role\": \"user\",\n      \"content\": \"{{ $json.prompt }}\"\n    }\n  ],\n  \"modalities\": [\"image\", \"text\"],\n  \"image_config\": {\n    \"aspect_ratio\": \"16:9\"\n  }\n} ",
        "options": {}
      },
      "type": "n8n-nodes-base.httpRequest",
      "typeVersion": 4.3,
      "position": [
        0,
        0
      ],
      "id": "0456bd94-c438-465b-b610-05d80019bbf3",
      "name": "Generate Image"
    },
    {
      "parameters": {
        "operation": "toBinary",
        "sourceProperty": "base64Data",
        "options": {}
      },
      "type": "n8n-nodes-base.convertToFile",
      "typeVersion": 1.1,
      "position": [
        416,
        0
      ],
      "id": "e4f4eb4d-eb27-449e-bd3c-dd773fee36bf",
      "name": "Convert to File"
    },
    {
      "parameters": {
        "jsCode": "const dataUrl = $json.choices[0].message.images[0].image_url.url;\nconst base64Data = dataUrl.replace(/^data:image\\/\\w+;base64,/, '');\nreturn { base64Data };"
      },
      "type": "n8n-nodes-base.code",
      "typeVersion": 2,
      "position": [
        208,
        0
      ],
      "id": "bf3d0e9b-23df-4001-867d-2ef62132c428",
      "name": "Get base64"
    },
    {
      "parameters": {},
      "type": "n8n-nodes-base.manualTrigger",
      "typeVersion": 1,
      "position": [
        -432,
        0
      ],
      "id": "76b28b68-fa44-448b-b40c-2096755e3a58",
      "name": "When clicking ‘Execute workflow’"
    },
    {
      "parameters": {
        "assignments": {
          "assignments": [
            {
              "id": "2f7b309b-879c-43d7-abe5-bbed225b392a",
              "name": "prompt",
              "value": "sample prompt",
              "type": "string"
            },
            {
              "id": "50a395b2-83c7-48ce-9cdc-1b67923c77ba",
              "name": "proxy_url",
              "value": "https://your-proxy-domain/v1/chat/completions",
              "type": "string"
            },
            {
              "id": "24953070-449e-47fb-9968-caa52720cf82",
              "name": "api_key",
              "value": "your-api-key-1",
              "type": "string"
            }
          ]
        },
        "options": {}
      },
      "type": "n8n-nodes-base.set",
      "typeVersion": 3.4,
      "position": [
        -224,
        0
      ],
      "id": "ca4442e8-adb3-4fe3-a2e1-d58dddc69b78",
      "name": "Input config"
    }
  ],
  "pinData": {},
  "connections": {
    "Generate Image": {
      "main": [
        [
          {
            "node": "Get base64",
            "type": "main",
            "index": 0
          }
        ]
      ]
    },
    "Get base64": {
      "main": [
        [
          {
            "node": "Convert to File",
            "type": "main",
            "index": 0
          }
        ]
      ]
    },
    "When clicking ‘Execute workflow’": {
      "main": [
        [
          {
            "node": "Input config",
            "type": "main",
            "index": 0
          }
        ]
      ]
    },
    "Input config": {
      "main": [
        [
          {
            "node": "Generate Image",
            "type": "main",
            "index": 0
          }
        ]
      ]
    }
  },
  "active": false,
  "settings": {
    "executionOrder": "v1"
  },
  "versionId": "c2df0a2d-2715-4aab-ac4d-83365ff6555a",
  "meta": {
    "instanceId": "87a32b77896263bd56ebc621c5133167cbeee66743c9f89999f622d0ecb8f05e"
  },
  "id": "4mZR2HYNDBdPLAGT",
  "tags": []
}
Add CLI Proxy API to Claude Code, Codex, Gemini CLI
Everything is already explained there; I personally only use Claude Code with Gemini models to save costs.
Good luck!