Step-by-step Guide to Installing and Using Google Antigravity
Most people still think AI is only at the ChatGPT level:
- Type a question – get an answer.
- Give a request – get some text.
That was the mindset from 2 years ago.
People still assume AI stops at AI Chatbots, at GenAI. In reality, we’ve already moved into a new phase: Agentic AI.
Agentic AI now is completely different. It doesn’t wait for you to ask. It takes on a task and then executes it from start to finish. It reads files by itself. Processes data by itself. Writes results by itself. Reports back by itself. You don’t need to sit there monitoring it – you just receive and review the final output.
The tool I’m talking about is Google Antigravity.
Why Google Antigravity and not Claude Code, Cursor, or any other tool? Because it’s free. No complex installation. No dev team required. No coding skills needed. No barrier to Agentic AI.
You only need to know how to "assign work" properly. You’ll be surprised at how far AI has come.
I rarely FOMO over any tool, but Antigravity truly is a gift that I have to share so more people know about it and try it. Antigravity can:
- Read the entire client brief, research the market on its own, and output a complete proposal
- Analyze monthly sales data, write an insights report, and propose upsell strategies
- Read a client meeting transcript, summarize pain points, and draft a personalized follow-up email
- Plan a month’s worth of content based on a brief, write captions, and categorize everything by channel and format
These are tasks that 2–3 staff members currently have to spend all day doing. If you know how to leverage Antigravity, you can work faster, make fewer mistakes – and focus on what truly matters.
Overview of Google Antigravity

In recent years, AI has gradually changed how developers write code. However, most AI tools today still only function as code suggestion assistants. Google Antigravity was created to overcome that limitation.
Google Antigravity is a software development platform built with an Agent-first approach – prioritizing AI agents. Instead of just supporting auto-complete like traditional IDEs, Antigravity treats AI as an autonomous agent capable of:
- Automatically understanding and handling requests expressed in natural language
- Building a clear roadmap for task execution
- Writing and editing source code
- Running commands in the terminal
- Browsing the web to look up documentation
- Testing, evaluating, and iterating on results
Put simply: Google Antigravity doesn’t just help you code; it helps you build the product.
Its core features include: the ability to orchestrate multiple agents working in parallel, an integrated browser that lets AI automatically inspect the interface (UI/UX), and an Artifacts system that transparently stores the history of code changes.
Step-by-step Guide to Installing Google Antigravity from A to Z
Prerequisites before installation
Before you start, make sure you have these 4 things ready:
1. A personal Gmail account
Google Antigravity is currently offered as a preview version for personal Gmail accounts. You don’t need a Google Workspace or business account. Each account has certain usage limits, suitable for learning and experimentation.
2. A personal computer
Antigravity supports Windows, macOS, and Linux. Note: Antigravity does not yet fully support in-browser use, so you must install the software on your computer.
3. Google Chrome browser
Even though Antigravity is a desktop application, Google Chrome is still required – for login/account verification and to ensure full compatibility with its features.
4. A stable Internet connection
Antigravity runs on Google’s AI and cloud services. A weak connection can cause slow AI responses or interrupt task execution.
8 Steps to install Google Antigravity
Step 1: Go to the Google Antigravity download page
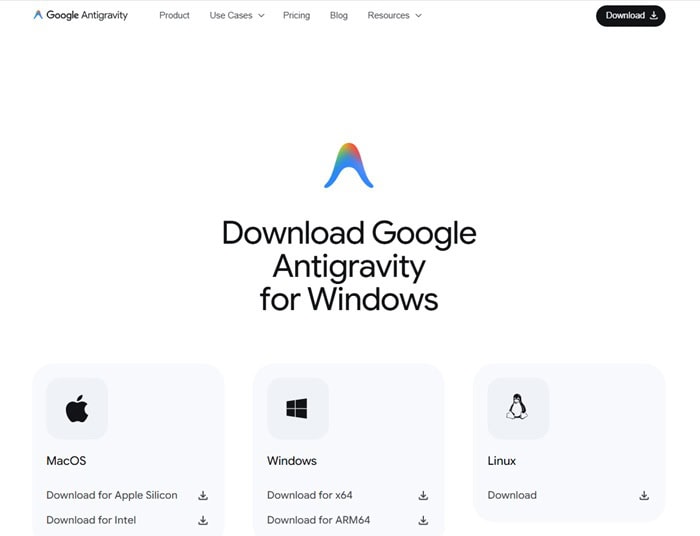
Open Google Chrome → go to the Google Antigravity page → select the correct operating system and download the installer.
Step 2: Open the file and start the installation

Double-click the downloaded file to launch the installer → click Next to begin the installation and follow the on-screen instructions.
Step 3: Choose the appropriate installation type
You have two options:
- Fresh Start – Start completely from scratch. Suitable for beginners who have never used VS Code or Cursor.
- Import configuration from VS Code or Cursor – For users who already have an existing development environment.
If you’re new, choosing Fresh Start is the safest and easiest way to get familiar.
Step 4: Choose the display theme

- Dark theme – Dark interface, easier on the eyes during long work sessions.
- Light theme – Bright interface, suitable for those who prefer a traditional look.
Step 5: Configure permissions for the AI Agent

This is an important step – you decide what the AI is allowed to do:
- Permission to run commands in the Terminal: Allow the Agent to run commands automatically or require your approval first.
- Permission to run JavaScript in the integrated browser: Control how the Agent interacts with the web.
- Work review mode: Decide when the Agent must ask you to review work before continuing.
If you’re new, prioritize options that require approval – to better control and understand what the AI is doing.
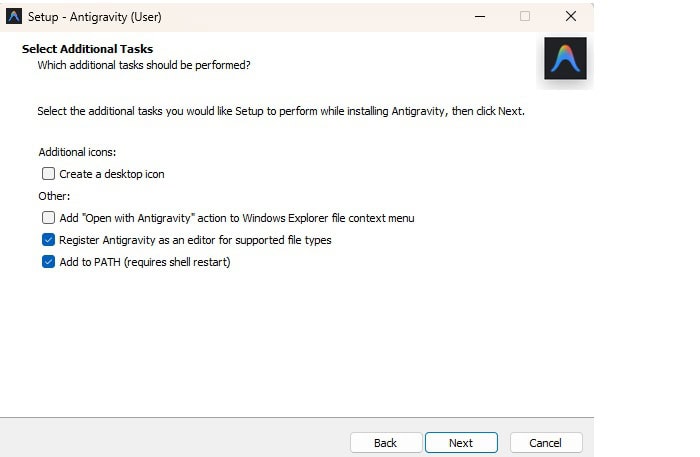
Step 6: Set up the editor and extensions
After configuring permissions, Antigravity lets you customize the code editor:
- Select extensions suitable for the programming languages you plan to use.
- Install command-line tools (CLI) so you can call Antigravity directly from the terminal if needed.
Step 7: Sign in with your Gmail account

Antigravity will open a Google Chrome window to authenticate your Gmail account. After you sign in successfully, you’ll be granted access to use Google Antigravity in free preview mode.
Step 8: Finish and start using
Review the terms of use → click Next to finish. The main Google Antigravity interface will appear right after.
Next step: Preload a "brain" for Antigravity
After installation, Antigravity is still in a "blank" state – the AI works well, but it doesn’t yet know your workflows, your processes, or the specific tasks you want to assign.
To get started faster, I’ve prepared an open configuration pack: Antigravity Kit.
This kit includes:
- 7 specialized Agents: an Orchestrator for overall coordination, an Explorer for research, a Project Planner for planning, a Product Manager for writing PRDs, a Documentation Writer for documentation, an SEO Specialist for content optimization, etc.
- 5 Skills: Knowledge packs loaded on demand – brainstorming, writing plans, creating documents, behavioral thinking, SEO fundamentals.
- 6 Workflows: Structured slash commands –
/plan,/brainstorm,/orchestrate,/status, and more.
Instead of tinkering from scratch, you can load this entire kit into your project with a single command – right inside Antigravity’s terminal.
How to load the Antigravity Kit into a project
Step 1: In Antigravity, open (or create) a project folder you want to work in.
Step 2: Open the integrated terminal in Antigravity (shortcut Ctrl + ` on Windows/Linux or Cmd + ` on macOS).
Step 3: Run the following command to download the kit into the .agent folder in your project:
git clone https://github.com/leolionart/antigravity-kit .agentAfter a few seconds, the .agent/ folder will appear in your project with all the agents, skills, and workflows.
Step 4: Start chatting with Antigravity and try a workflow right away. For example:
- Type
/brainstormto begin a structured brainstorming session. - Type
/planto have the AI help you create a project plan. - Or simply describe your task in Vietnamese – the AI will automatically identify the appropriate agent and handle it.
Note: The kit is designed to work seamlessly with Antigravity, Gemini CLI, and Claude Code. You don’t need to know how to code to use it – you just need to be able to describe your tasks clearly.
Conclusion
Installing Google Antigravity isn’t just about downloading and opening the software – it also involves configuring permissions for the AI Agent, choosing an interface, and setting up the editor to match your way of working.
Once you’ve finished the installation and loaded the Antigravity Kit, you’re no longer starting from a blank page. You already have a small AI team – capable of planning, writing documentation, doing research, and collaborating with one another.
It’s no longer just "ask – answer." It’s assign tasks – receive results.
Give it a try and feel the difference.